“GrandMagazine Wordpress Template” Documentation by “ThemeGoods”
“GrandMagazine Theme Documentation”
Table of Contents
- What's Included
- Installation
- Setting up header
- Setting up Footer
- Setting up Sidebar
- Setting up Pages & Contact Page
- Setting up Homepage
- Setting up Blog Post
- Setting up Category
- Setting up Image Gallery
- Widgets
- Theme Customize
- Theme Translation
- WPML Plugin For Multilingual Content
- How to update the theme
- Updating from existing theme
- How to speed up your site using plugins
- Setting up shop using Woocommerce
A) What's Included - top
When you purchase our theme from Themeforest. You can download GrandMagazine files from Themeforest > Your Account > Downloads.
Navigate through your purchased items and find GrandMagazine. Click download button then you will se 2 options. Main file contain everything. Installable Wordpress Theme is included only installable Wordpress theme file. Check list of what's included when you download the main file option.
- Installable Theme File (.zip) - You can upload this file to your Wordpress to install the theme.
- Documentation - Contain theme documentation file.
- Licensing Folder - Contain all licensing info files.
- Changelog (.txt) - Included all theme versions changelog info
Theme Support
All of our themes come with free support and currently we handle all support questions through Our Support System.
In order to help speed up solution for your requests. Please follow steps below before submitting a new ticket. This is for the benefit of everyone in order to help find the solution for your question quickly.
- Make sure you are running the latest version of theme and the latest version of WordPress.
- Check out theme documentation for the answer to your question.
- Disable any additional 3rd party plugins you are using to check if it fixes the issue.
- If you still have the issue. Submit a ticket with URL of page which has issue.
- Responding to questions or problems regarding the item and its features
- Fixing bugs and reported issues
- Providing updates to ensure compatibility with new software versions
- Customization and installation services
- Support for third party software and plug-ins
B) Installation - top
In order to begin installing GrandMagazine theme. You need the latest version of Wordpress. Here is the download URL. Once you downloaded and set it up, You are ready to go.
Upon downloading the package, you will have an Installable Theme File (.zip) inside the theme package. Follow the steps below to install theme

- Go to your Wordpress Dashboard and navigate to Appearance > Themes
- Click Add new and hit upload button
- Select GrandMagazine Installable Theme File (.zip) file from your computer and click "Install Now" button
- Once finished uploading theme file. Go to Appearance > Themes and activate it.
- Then you will be redirected to theme admin panel page.
Common Wordpress Installation Issue
Missing style sheet error when installing the theme A common issue that can occur with users new to installing WordPress themes is a “Broken theme and/or stylesheets missing” error message being displayed when trying to upload or activate the theme. This error message does not mean that the theme you have purchased is broken, it simply means it has been uploaded incorrectly. Luckily, there is a very easy fix.Wordpress Tutorials
In order to use the theme. You have to install a working version of WordPress. If you are new to WordPress and need help installing it. Below are few tutorials and video tutorials created by WordPress and WooThemes.
Required Plugins
- Grand Magazine Theme Post Options & Gallery – Add theme gallery functionality and shortcode.
- Post Views Counter – Add post view count for blog post which use for creating trending posts section.
- Categories Images - Add featured image option for category page.
- Contact Form 7 - Add contact form functionality to page.
- Social Media Share Buttons | MashShare - Add sharing count for blog post which use for creating hot posts section.
- WordPress Importer - Add import demo content functionality.
Additional Plugins We use on demo site
- WP Review – helps provide post review feature.
- EWWW Image Optimizer – helps optimise your images file size without reducing its quality.
- Sharpen Resized Image – helps sharpen your image quality without increasing file size.
- WP Super Cache – add caching to your WordPress for better loading speed.
Install required plugins
Go to your Wordpress Dashboard and navigate to Appearance > Install Plugins. Select all required plugins and click install option.

Import Demo Content
When you first install the theme. It won’t included all extra content that you have seen from live demo site. You can choose to import demo contents or only demo settings and here are the different.What’s included: posts, pages, images, videos and theme settings (typography, colors, styling and theme options).

Recommended PHP Configuration Limits
Many issues which may occurs when you are using some features of theme for example demo import, menu settings. are related to low PHP configuration limits on your webhost. The solution is to increase settings. You can change it by contacting your webhost and ask them to increase the limits. Here are recommended PHP configuration limits.
- max_execution_time 180
- memory_limit 128M
- post_max_size 32M
- upload_max_filesize 64M

You can check all limitation via Theme Setting > System and make sure all settings are green.
- Install and activate Grand Magazine Theme Post Options & Gallery plugin before you proceed.
- Open Theme Setting > Demo Content then select which demo you want to import and click “Import Selected”.
- It can take few minutes to import everything (depends on your webhost location and connection speed).
- Once it’s completed you will see success message and you can now enjoy demo content.
- Demo Import Fails: “Sorry but your import failed.”
- If you get this error, most likely the importer can not work with your webhost. You will need to ask your webhost to increase max_execution_time (or any other webserver timeout to at least 300 secs) and memory_limit (to at least 196M).Another thing which might solve the issue is to increase WordPress memory limit setting. Add below code to your wp-config.php before importing demo content.define(‘WP_MEMORY_LIMIT’, ‘500M’);
define( ‘WP_MAX_MEMORY_LIMIT’, ‘500M’ );Basically, If the limits on your server settings are very low then the content will not import.
B 1) Setup Header - top
Setting up Menu
Theme Support custom WordPress menu, you can organise them into dropdown menu too.

- Go to Appearance > Menus. Click "Create Menu" button
- To add menu items, select one of your pages/posts on the left hand boxes. Then click "Add To Menu".
- If you want to add custom link menu item (for example home link). Select "Links" and enter URL, Link Text there.
- You can organise your menu items using drag&drop functionality. Simple drag a menu item right below to the parent menu item.
- After setting up your menu, scroll down to the bottom of the page then assign the menu to "Primary Menu" in the Theme Locations box.
- Primary Menu - Main menu under logo
- Top Bar Menu - Menu at top of page layout (doesn't support sub menu)
- Side (Mobile) Menu - Slide in menu. It's optional on desktop and primary menu for mobile devices
- Footer Menu - Menu at bottom of page layout (doesn't support sub menu)
Sticky Menu (Optional)
If you enable sticky menu option. When visitor scroll down to page. The menu bar will stay at top while visitor scrolling. You can enable this option via Appearance > Navigation > General > Enable Sticky Menu
Customise Main Menu Options and Colors

You can fully customise main menu options ex. typography, colors, background colors etc. Go to Appearance > Customize > Navigation
Setup Top Bar Menu (Optional)
- Go to Appearance > Menus. Click “Create Menu” button
- To add menu items, select one of your pages/posts on the left hand boxes. Then click “Add To Menu”.
- If you want to add custom link menu item (for example home link). Select “Links” and enter URL, Link Text there.
- You can organise your menu items using drag&drop functionality. Simple drag a menu item right below to the parent menu item.
- After setting up your menu, scroll down to the bottom of the page then assign the menu to “Top Bar Menu” in the Theme Locations box.
Note: Top Bar Menu is not support sub menu.
Setup Side Menu (Mobile Menu)
Side menu is hidden by default. Visitor click three bar icon on the top right of screen to open it. It’s also main menu or tablet (portrait view) and mobile devices.
- Go to Appearance > Menus. Click “Create Menu” button
- To add menu items, select one of your pages/posts on the left hand boxes. Then click “Add To Menu”.
- If you want to add custom link menu item (for example home link). Select “Links” and enter URL, Link Text there.
- After setting up your menu, scroll down to the bottom of the page then assign the menu to “Side (Mobile) Menu” in the Theme Locations box.
Customise Side Menu Options and Colors

You can fully customise main menu options ex. typography, colors, background colors etc. Go to Appearance > Customize > Navgiation > Side Menu
Setup Footer Menu (Optional)
- Go to Appearance > Menus. Click “Create Menu” button
- To add menu items, select one of your pages/posts on the left hand boxes. Then click “Add To Menu”.
- If you want to add custom link menu item (for example home link). Select “Links” and enter URL, Link Text there.
- You can organise your menu items using drag&drop functionality.
- After setting up your menu, scroll down to the bottom of the page then assign the menu to “Footer Menu” in the Theme Locations box.
- Open Appearance > Customize > Footer > Copyright > Copyright Right Area Content and select “Footer Menu”.
NOTE: Footer menu is not support sub menu.
Add Contact Info (Optional)
You can add contact information displays on top bar. Go to Appearance > Customize > Navigation > Contact Info
Note: Please make sure you enable Top Bar in order to display contact info content.
Setup Social Icons
First you need to add your social media accounts. Go to Theme Settings > Socials Profiles and enter your profiles accounts there. If you don’t want to display some social icons, simply leave them blank and it won’t displays on live site.
Upload Logo
By default theme displays its standard logo in header. You can replace it with your logo image. Go to Appearance > Customize > Logo & Favicon Click “Select Image” button and select logo image from your computer or media library.
Favicon (Optional)

Favicon option is also onAppearance > Customize > Logo & Favicon. Favicon is an icon for your site display in various places including browser address bar, or next to website name in bookmark list. You simply click select image button and select favicon file to upload (recommend .png file)
Top Bar
Top bar allow to display extended content ex. top menu, social icons etc. above main menu area, To enable it open Appearance > Customize > Menu > Top Bar
There are options to change the top bar background color, font color and border color too. Simply click on the colorbox to open color picker panel. Select color you want and once finish customising, save changes.
B 2) Setting up Footer - top
The first area of theme footer is a widgetized section which you can displays them into 1-4 columns. This content can be organised in WordPress Dashboard > Appearance > Widgets
Setup Footer Sidebar
- First you have to enable it. Go to Appearance > Customize > Footer > General < Footer Sidebar Columns
- Select number of columns to display from 1-4
Setup Footer Sidebar Widgets

- To add widgets, go to Appearance > Widgets
- You will find “Footer Sidebar” section. Simply drag and drop widgets you want from the left side boxes into the “Footer Sidebar”.
Setup Footer Colors

You can change footer background color, font color and etc. Go to Appearance > Customize > Footer > Colors once finish customising. Click “Save All Changes” button.
Setup Copyright Bar
Below the widgetized area of footer is copyright bar where you can add your copyright text including link to it. Go to Appearance > Customize > Footer > Copyright
The go to top option if you enable it. It will display arrow up button when visitor click on it. It will redirect to the top of page.
Instagram Footer Photostream


- Go to Theme Setting > Social Profiles and enter instagram username option.
- Next you will need to login to your Instagram account and click here to find Access Token.
- Once you get Access Token. Go to Theme Setting > Social Profiles and enter Instagram Access Token option then save changes
- Now you can add Custom Instagram Widget to any sidebar you want using Appearance > Widgets.
You can also display Instagram photostream at the bottom of page before footer. Please make sure you follow above steps of how to setup Instagram Access Token. Then go to Theme Setting > Social Profiles > Photo Stream and Select photo stream photo source. It displays before footer area to “Instagram”.
Flickr Footer Photostream
You can also display Flickr photostream at the bottom of page before footer. Go to Theme Setting > Social Profiles > Photo Stream and Select photo stream photo source. It displays before footer area to “Flickr”.

B 3) Setting up sidebar - top
Pre defined Sidebars
- Page Sidebar – Default sidebar for homepage and any new pages created.
- Blog Sidebar – Default sidebar for any new blog template created.
- Contact Sidebar – Default sidebar for contact page.
- Single Post Sidebar – Sidebar for all single posts.
- Archives Sidebar – Sidebar for post archive page.
- Category Sidebar – Sidebar for post category page.
- Tag Sidebar – Sidebar for post tag page.
- Footer Sidebar – Sidebar for footer widgets area.
Create a New Sidebar
Theme has pre-defined sidebar but you can also create your own custom sidebar for your pages.

- Go to Theme Settings > General you will see Custom Sidebar Settings.
- Enter sidebar name you want to create and click save changes
Assign widgets to the sidebar

You can add widgets to the sidebar using Appearance > Widgets You will find your selected widget on the left side. Simply drag and drop widgets you want from the left side boxes into the sidebar box.
B 4) Setting up Pages & Contact Page

- Go to WordPress Dashboard > Pages > Add New
- Add page title and you will find “Page Options” box on the right side.
- Select your parent page in page attribute option box on the bottom right.
- Select your page template from template dropdown list in page attribute option box on the bottom right.
- Enter your page content to editing field. You can use visual or text editor. Page content is mainly built using text, HTML or shortcodes.
Page With Sidebar
Theme has 2 general page with sidebar templates. You can select between left and right sidebar templates. Follow above steps and when you select page template select Page With Right Sidebar or Page With Left Sidebar as page template.
Next look at page option box, select the sidebar you want to display on this page and save changes.
Page Header Background

When you create a page. Check “Display Page Title” in page option meta box. You can upload background image to header area. Look at featured image at the bottom right of edit page/post and upload image you want to display as header background image.

You can customise page title alignment, typography, font size etc. Go to Appearance > Customize > Header.
Shortcode Generator
You can use Shortcode Generator in Shortcode option box below editing field to generate shortcode. Simply select shortcode you want to use and enter its options. Once finish click “Generated Shortcode” and copy shortcode to editing fields.

Page Options

- Make Menu Transparent – Check this option if you want to make main menu background transparent. If you enable this option. Please make sure you also upload page featured image.
- Hide Page Title & Tagline – Check this option if you want to hide page title & tagline.
- Page Tagline(Optional) – Enter page tagline. It will displays under page title (optional)
- Page Sidebar(Optional) – Select this page’s sidebar to display (support only page templates with sidebar)
Setup Contact Page
First, you have to install "Contact Form 7" plugin. Once you installed and activated Contact Form 7. It will create sample contact form for you. You can customize it via from your admin sidebar,Pages > Add New


From your admin sidebar, open Contact > Contact Forms. Select form you want to customize.

Now you will see edit contact form page. There are several tabs for you to customize. Next you can use contact form 7 shortcode from edit contact form page. For example.
[contact-form-7 id="271" title="Contact form 1"]

Copy shortcode and you can add it to page content so it displays contact form.
B 5) Setting up Homepage - top
By default, when you activated theme. Your homepage will display your recent posts and you can change its option. From your admin sidebar Settings > Reading > Front page displays select "Your latest posts". You can also change number of blog posts per page there too.
Change homepage layout

You can customize homepage layout. Go to Appearance > Customize > Blog > Layout > Homepage Layout and select layout you want then save changes. You can also customize other default Wordpress pages ex. category, archive etc. there too.
B 6) Setting up Blog Post - top
Creating a blog post
First thing to create blog content is to create a post post. Theme has various post options for you display different content on your blog post. Here are the steps to create a blog post.

- Go to WordPress Dashboard > Posts > Add New
- Enter post title and content. You can use any shortcode or HTML to editing field.
- Assign this post to category using categories box on the right side
- Add tags to this post. Type tag name in to the field in Tags box on the right side.
- Upload post featured image using set featured box on the bottom right side. All pages will use this image for post preview image and thumbnail.
- Once you finish, click Publish.
Post Options

- Post Layout – Select single post page layout.
- Featured Content Type – Select featured content type to displays at the top of this post. You can select from Image, Gallery, Vimeo Video and Youtube Video.
- Gallery – Select image gallery you want to display (if you select featured content type as Gallery)
- Vimeo Video ID – Enter Vimeo Video ID ex. 73317780 (if you select featured content type as Vimeo Video)
- Youtube Video ID – Enter Youtube Video ID ex. 6AIdXisPqHc (if you select featured content type as Youtube Video)
Post Review Options
To have review feature. Please make sure you install this plugin name "WP Review". Then when you edit post, there is Review box under Shortcode Options box.

Select "Review Type" you want. For example "Star" then you can add review feature name and star. Once you finish customising review options for the post then update the post.
Single Post Settings


- Display post featured content – This option will display post’s featured image or gallery at the top of single post page.
- Display post tag – This option will display post’s tags at the bottom of single post page.
- Display about author – This option will display post’s author information at the bottom of single post page.
- Display related posts – This option will display related posts under main post content.
- Selected related posts items – Select number of related posts to display on single post page.
- Display more from category posts – This option will display other posts from the same post's category.
- Selected more from category posts items – Select number of other posts from the same post's category to display on single post page.
- Display more from editor's pick category posts – This option will display other posts from the editor pick post's category.
- Selected more from editor's pick category posts items – Select number of other posts from the editor pick post's category to display on single post page.
Post Typography

You can also customise post title and other typography settings for blog posts via Appearance > Customize > Blog > Typography
Posts per page
 From your admin sidebar, open Settings > Reading. Then adjust number of "Blog pages show at most". Once you finish, click "Save Changes".
Featured Category Settings


Featured Category posts will displays its 5 recent posts on homepage. In order to make it displays, you have to select featured category via Appearance > Customize > Blog > General > Featured Posts Category
Editor Pick Category Settings


Editor Pick Category posts will be used in filterable option on homepage and last section on single post page. In order to make it displays, you have to select editor pick category via Appearance > Customize > Blog > General > Editor Picks Post Category
Hot Posts Settings

Hot posts are posts which have most view on your site. You can customize its color, how to select post as hot one. For example if you select 1 month. It will sort posts which are published within 30 days and select number of hot post items by setting you have in "Select Hot Posts items". You can customise hot posts setting via Appearance > Customize > Blog > General > Hot Posts Settings

If post you see is considered as hot post. You will see fire icon at the top left on post featured image.
Trending Posts Settings

Trending posts are posts which have most share or comments on your site. You can customize its color, how to select post as trending one. For example if you select 1 month. It will sort posts which are published within 30 days and select number of trending post items by setting you have in "Select Trending Posts items". You can customise trending posts setting via Appearance > Customize > Blog > General > Trending Posts Settings

If post you see is considered as trending post. You will see lightning icon at the top left on post featured image.
B 7) Setting up Category - top

You can organise posts into category. Each post can be assigned to multiple categories. First you have to create a category. Open Posts > Categories. You will see list of current categories you have. To add new one. Enter Category name, slug and click "Add New Category" button.

Now when you create a blog post. Look at categories option box, select categories you want to assign and save changes.
Setting up Category Page

When you created a category. Wordpress actually creates category for you. To add a category archive to one of your menus, go to “Appearance > Menus” in the WordPress admin. Look for the section labeled “Categories.” Then, select the categories you want and add them to your menu.
Setting up Category Page Header Image

Open Posts > Categories. You will see list of current categories you have. Select one you want to edit and you see editing form. You will see "Image" option, it will open upload box or you can also selected uploaded image from media library.
NOTE: If you want see "Image" field in edit category page. Please make sure you install required plugin name "Category Image".
You can customize category page layout. Go to Appearance > Customize > Blog > Layout > Category Page Layout and select layout you want then save changes.
Setting up Browse Category Page

Please make sure you install required plugin name "Category Image". Then open Posts > Categories. You will see list of current categories you have. Select one you want to edit and you see editing.
NOTE: If you have any category which has featured image setup. Category section in browse page won't display.
B 8) Setting up image gallery - top
First you have to create a gallery. From your admin sidebar, open Galleries > Add New Gallery. You will get add new gallery form. Enter gallery title and description then click “Publish”.

Next you have to add images to this gallery. From gallery admin page. Click on “Upload Image”.
Then select images you want to upload to this gallery. Once you finish upload each image. It will automatically attach to this gallery. You can also change image caption and description by clicking image from this page. If you want to change order of images within gallery. You can easily drag&drop image next to each one. Once you finish dragging, click “Update” to save changes.
Setting up gallery as post featured content

When you create a post. Look at post option box, select "Gallery" as content type. You will see gallery option with list of galleries. Select the one you want to display on this post and save changes.
B 9) Widgets - top
All widgets can be used in standard Wordpress widget system in Appearance > Widgets. You can drag&drop the widget on the left side over sidebar option on the right side. Each widget has its settings option and you put as many widgets as you want to the sidebar. Once you change the setting of widget, please make sure you click Save button.
Facebook Page Like Widgets
On theme demo site. There is Facebook Page widget which can easily create using this plugin.
Mailing list subscription Widgets
On theme demo site. There is Mailing list subscription which can easily create using MailChimp server (You can create free account there ). You can download the plugin here.
Instagram Widgets
- Go to Theme Setting > Social Profiles and enter instagram username option.
- Next you will need to login to your Instagram account and click here to find Access Token.
- Once you get Access Token. Go to Theme Setting > Social Profiles and enter Instagram Access Token option then save changes
- Now you can add Custom Instagram Widget to any sidebar you want using Appearance > Widgets.
Please make sure you follow above steps of how to setup Instagram Access Token. Then when you add Instagram widget to sidebar. Enter number of photos you want to displays and save changes.
B 10) Theme Customize - top
Theme also support Wordprss customize. Go to Appearance > Customize. It will load all customization options on the left side. Simple change each options and it will preview results instantly on the right side. Once you finish customising. Click "Save" button.
B 11) Theme Translation - top
Theme includes bunch of PO translation files for each languages so you can use standard translation tools to help translate theme output strings to your desired language.
WordPress Translation Setting
For Pre-Wordpress 4.0 users please follow below steps
- Login to your FTP account and edit wp-config.php file.
- In wp-config.php file, look for WPLANG constant for example define(‘WPLANG’, ”);
- Define WPLANG constant by adding ISO language code of your desired language. For example if you want to add German language. Use this code define(‘WPLANG’, ‘de_DE.po’);
For WordPress 4.0 + users please follow below steps

- Login to your FTP account and edit wp-config.php file.
- In wp-config.php file, look for WPLANG constant for example define(‘WPLANG’, ”);
- Define WPLANG constant by adding ISO language code of your desired language. For example if you want to add German language. Use this code define(‘WPLANG’, ‘de_DE.po’);
- Login to your WordPress Dashboard and navigate to Settings > General Settings
- Make sure “Site Language” option is set to your desired language.
Storing Translation Files
By default storing inside theme folder. The theme language folder is wp-content/themes/tgGrandMagazine/languages this method has one downside. Because whenevery you update the theme. The whole language folder will be replaced with original version which overwrite your translation files.
NOTE: So the solution is to backup your translation file before updating theme.
Translating The Theme
Theme use PO translation file which is industry standard translation method. In theme folder you will find a folder called languages. You will find each languages files store in the folder.
- *.po – A lists of all text strings in theme. The text strings are in English and you can add translation to each of text string.
- *.mo – This is the compiled .po file and is used by WordPress to translate the theme
If your language isn’t included in the theme language files. You have to create a new .po file from original Theme.po located in theme’s languages folder then save the new .po file with your language code for example de_DE.po
Translating The Custom Post Type Plugin
Custom Post Type Plugin use PO translation file which is industry standard translation method. In plugins folder you will find a folder called languages. You will find each languages files store in the folder.
If your language isn’t included in the theme language files. You have to create a new .po file from original GrandMagazine-custom-post-en_US.po located in theme’s languages folder then save the new .po file with your language code for example GrandMagazine-custom-post-de_DE.po
How to translate Po file using Poedit Application
Poedit application is the popular application uses to edit po file translation and it’s free. Click here to download Poedit application.

Now download and install Poedit application. Open language file you want to translate for example en_US.po You will find all English string in Source Text box.
Select text string you want to translate, add your translation text to “Translation” field. Once you finish translating. Save the file and it will automatically compiled to .mo file.
B 12) WPML Plugin For Multilingual Content - top
GrandMagazine support WPML plugin for Multilingual content . First you have topurchase WPML license from https://wpml.org and your can download the plugin from your WPML account page (download WPML Multilingual CMS). Then install the plugin. From your admin sidebar, open Plugins > Add New > Upload. Then upload and install the plugin. Once you installed, activate it and it will be ready to use.
Now you will have WPML menu on the bottom left of Wordpress Dashboard. The first step is to setup your current language.
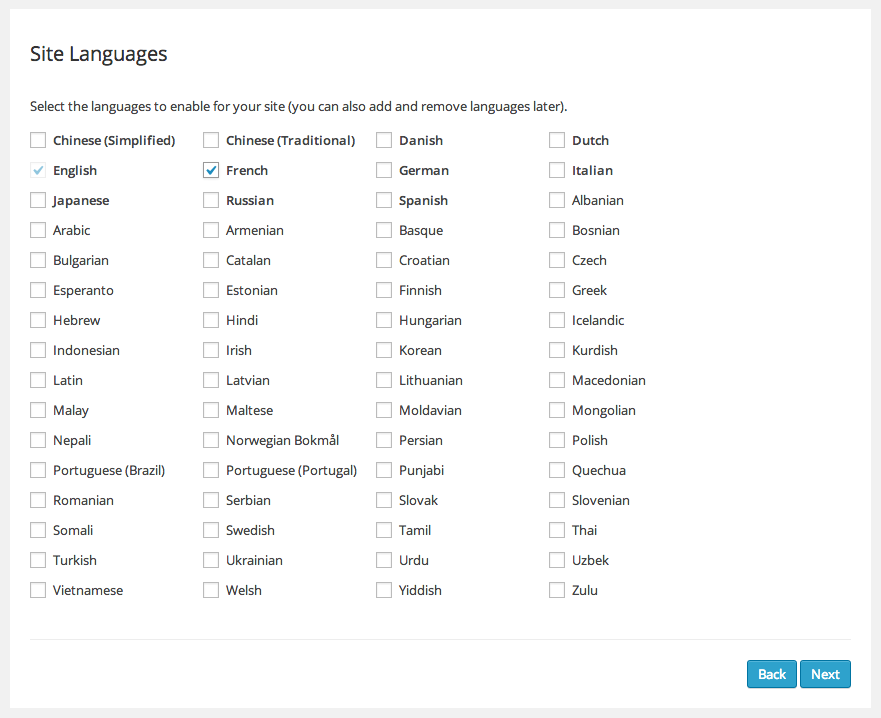
Next step. Select other languages you want to use on your site.
The last step is to add language switcher to your site. There are many ways to add it. You can select sidebar to display language switcher from the option "Choose where to display the language switcher widget".
If you are familiar with PHP coding. You can also add custom language switcher using PHP code. Please see sample and tutorials here.
Another option is to add language switcher to your menu. Check "Display the language switcher in the WP Menu". option and select your main menu.

Next, go to your WPML account > Downloads and download WPML String Translation plugin. Install the plugin. From your admin sidebar, open Plugins > Add New > Upload. Then upload and install the plugin. Once you installed, activate it and it will be ready to use.

Open WPML > Theme and plugins localization and check "Translate by WPML." and click Save button. Now WPML should added all translation strings to the system.

Open WPML > String Translation you will see list of all translation text. Click translations and enter translated text.
This is a basic step to translate theme strings into multiple languages. You can learn more about advanced options and other WPML features from WPML site.
B 13) How to update the theme - top
- First you need to download the latest version of theme. Log into your Themeforest account and navigate to your downloads tab. Find the “GrandMagazine” theme purchase.
- Click the “download” button next to it and choose to download the “Installable WordPress Theme” which is just the WordPress file, or choose the “Main Files” which is the entire package which include theme documentation, plugins etc.
Update using WordPress Dashboard
- You may want to use a plugin to automate backing up your current theme and uploading the new version: http://wordpress.org/extend/plugins/easy-theme-and-plugin-upgrades/
- You need to deactivate “GrandMagazine” theme in the Appearance > Themes by simply activating a different theme. Once you activate a different theme, you can delete the GrandMagazine theme. Don’t worry. You really won’t loose any of your data.
- Get the “GrandMagazine-v…installable.zip” file from Themeforest Account > download. If you downloaded the “Main Files” from Themeforest, then you need to unzip the archive file you received, the GrandMagazine-v…installable.zip will be inside of it.
- Upload GrandMagazine-v…installable.zip using Appearance > Themes once you uploaded successfully, activate the theme.
Update using FTP
- You may want to use a plugin to automate backing up your current theme and uploading the new version: http://wordpress.org/extend/plugins/easy-theme-and-plugin-upgrades/
- Login to your FTP account. Navigate to wp-content > themes location and backup your “GrandMagazine” theme folder by saving it to your computer, or you can choose to simply delete it. Don’t worry. You really won’t loose any of your data.
- Get the “GrandMagazine-v…installable.zip” file from Themeforest Account > download. If you downloaded the “Main Files” from Themeforest, then you need to unzip the archive file you received, the GrandMagazine-v…installable.zip will be inside of it.
- Drag and drop the new “GrandMagazine” folder into wp-content > themes and select “Replace” if you didn’t delete it.
Common Issues
- Are You sure you want to do this?
If you get this message. Please check with your webhost upload file size limit and ask them to increase the limitation. - Theme install failed destination folder already exists
This is because WordPress allows you to have only 1 theme with the same name and folder. To get around this issue, please update theme using auto updater or FTP steps above.
B 14) Updating from existing theme - top
Regenerate all media from previous theme
If you update your existing blog site to GrandMagazine theme. You have to run this plugin to regenerate all posts's thumbnails from your existing theme setting. Once you installed the plugin, open Tools > Regen. Thumbnails and click on “Regenerate Thumbnails” button.
Setup Featured & Editor Picks Category Settings
Featured Category posts will displays its 5 recent posts on homepage. In order to make it displays, you have to select featured category via Appearance > Customize > Blog > General > Featured Posts Category
Editor Pick Category posts will be used in filterable option on homepage and last section on single post page. In order to make it displays, you have to select editor pick category via Appearance > Customize > Blog > General > Editor Picks Post Category
B 15) How to speed up your site using plugins - top
There are many ways to help speed up your site and here are some methods we use to speed up our demo sites and we want to share them to you.
Caching Plugin
You can use 3rd party plugin to add caching to your WordPress site. It helps speed up response time to your visitors. Here are 2 plugins we recommend.
- W3 Total Cache – Recommend for advanced user with many more options.
- WP Super Cache – Easy to setup caching plugin. Recommend for normal user.
Image Optimisation Plugin
Adding images to your content sometime causes site to load slowly. Here is EWWW Image Optimizer it helps optimise and compress your images files size without loosing quality.
NOTE: If you already have image uploaded and install EWWW Image Optimizer. Please run Regenerate Thumbnails plugin so your previous uploaded images are optimised.
B 16) Setting up shop using Woocommerce - top
You can integrate online shopping features by using one of the most popular shop WordPress plugin “Woocommerce”. In order to use it, you can download Woocommerce plugin for free from Woothemes.. Then follow below steps to install Woocommerce.
- Log into your WordPress Admin area.
- Look down the left hand column for “Plugins” and then click on the word “Plugins”.
- Just to the right of the title “(Manage) Plugins” in the image above, you can see a button marked “Add New”, click this button.
- The image above shows the option to upload the plugin from your own PC, Select the woocommerce.zip you had previously downloaded from Woothemes. Install the zip and click on “Activate Plugin”.
Then please find full documentation of “Woocommerce” plugin here
Once again, thank you so much for purchasing this theme. As I said at the beginning, I'd be glad to help you if you have any questions relating to this theme. No guarantees, but I'll do my best to assist. If you have a more general question relating to the themes on ThemeForest, you might consider visiting the forums and asking your question in the "Item Discussion" section.
ThemeGoods