Theme Support custom WordPress menu, you can organise them into dropdown menu too. You can also change its style, background color, sub menu color and many other using theme admin panel.
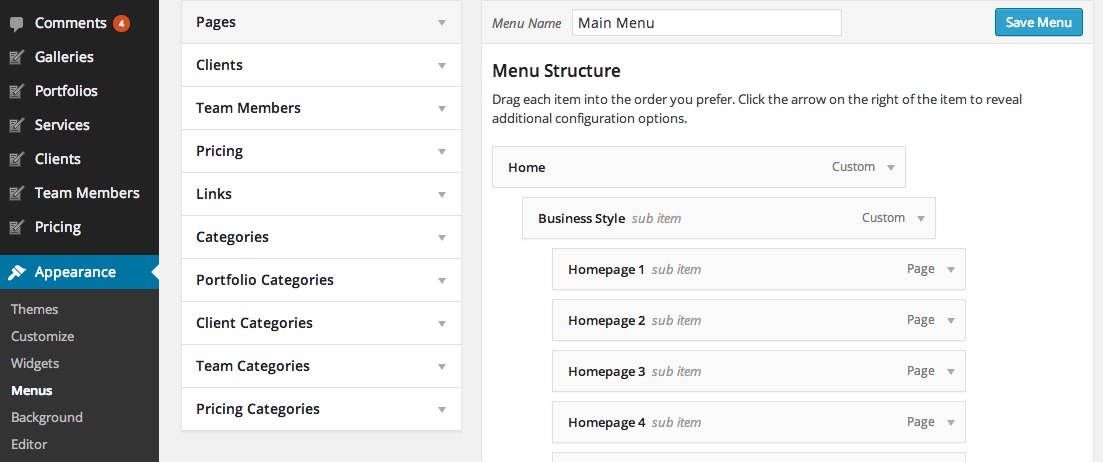
Setup main menu
- Go to Appearance > Menus. Click “Create Menu” button
- To add menu items, select one of your pages/posts on the left hand boxes. Then click “Add To Menu”.
- If you want to add custom link menu item (for example home link). Select “Links” and enter URL, Link Text there.
- You can organise your menu items using drag&drop functionality. Simple drag a menu item right below to the parent menu item.
- After setting up your menu, scroll down to the bottom of the page then assign the menu to “Primary Menu” in the Theme Locations box.
For those who are not familiar with WordPress menu system below are video tutorial.
Setup Menu Colors

You can change menu background, font colors, font family, size and etc. using theme admin panel. Go to Theme Settings > Header > Menu Settings
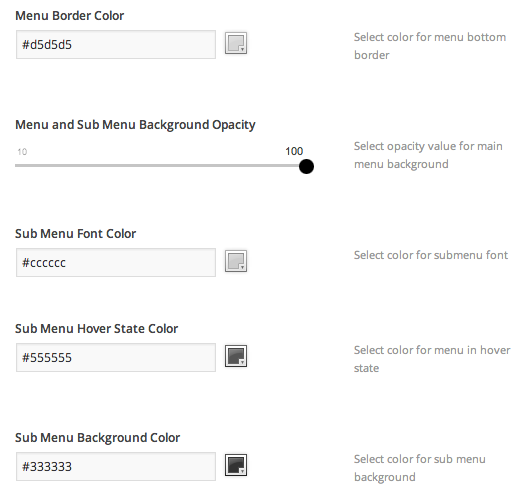
You can also change sub menu background, font colors, font family, size and etc too. Simple scroll down below main menu options. Once you finish customising. Click “Save All Changes”.
Sticky Menu
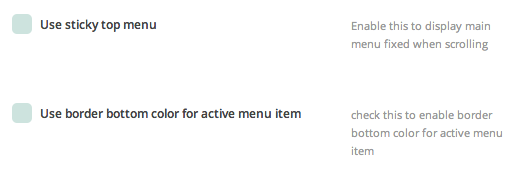
Proxima has Sticky menu option. If you enable this, when visitor scroll down on website. Main menu will display at the top of page. Also there is an option “Use border bottom color for active menu item” if you enable this option. The current menu item will display active border bottom in it.
Live Search

Theme also has built-in live search feature so it displays search results as user types. You can activate this option. Simply go to Theme Settings > Header > Search Settings and enable “Use Instant Search”. You can also enable/disable search bar in header too.
Cart Icon
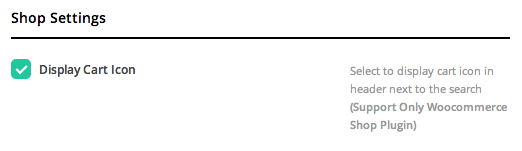
If you installed Woocommerce plugin for shopping cart feature. You can display cart icon which link to Woocommerce cart page in the header.
Setup footer menu
Theme also has another menu location which is located at the bottom right of all page. Here are steps of how to create footer menu
- Go to Appearance > Menus. Click “Create Menu” button
- To add menu items, select one of your pages/posts on the left hand boxes. Then click “Add To Menu”.
- If you want to add custom link menu item (for example home link). Select “Links” and enter URL, Link Text there.
- You can organise your menu items using drag&drop functionality. Simple drag a menu item right below to the parent menu item.
- After setting up your menu, scroll down to the bottom of the page then assign the menu to “Footer Menu” in the Theme Locations box.